
With the brain storming from Tim Holtz 12 Tags of 2013 : February from Tim Holtz, I have created the similar tag as well. I like to make the monthly tags at the ended of each month although Tim posted his inspiration in the 1st week of each month. It is because I can make use of other techniques together in the tag project. This time, I use the tattered floral challenge as one of the embellishment on my tag. It also matched with the St' Valentine's day theme because it always has heart, flowers, chocolate......etc.
As I am following Tim's steps to create the backgroud of the tag by using Distress Stain and color the "Queen" with Distress Markers. Therefore I only take a few photos for the processes. For details, you may visit Tim's blog which contains more details.

Distress a manila tag by swiping distress stain/barn door over the entire tag. I use this color which looks more bright then distress stain/festive barries. While drying the tag, spritz it with water to react the inks to create a great watery effect. (Yes, Extractly what Tim did!!!) I stamped the Queen image for 3 times, one on the distress background, two on the white stock and coloring the images by distress markers.


I cut a piece of kraft core seasonal impressions and die the edge for the top and bottom through big shot. I used the Wplus9 XOXO Border design dies, sand over the edges and use the Distress ink pad/vintage photo to add more vintage effect.

When I sticked the XOXO edge, I suddenly found that the "O" can overlapped with the Tag's hole. Thank god!! I no need to create another one. (Because my stamped image was so closed to the tag hole. The edge has no space to be sticked at the top.) The overlaping hole can let the below tissue ribbon going through.

Just like the steps from Tim's blog mentioned, it's really cool to create a piece of cool, durable tissue ribbon by using the tissue tape.

One more thing is missed, have you seen the heart with embossing effect. It was produed by using the Melt Art. The embellishment tutorial was posted in another articles:Sweet Heart : Melt Art .
tattered floral challenge

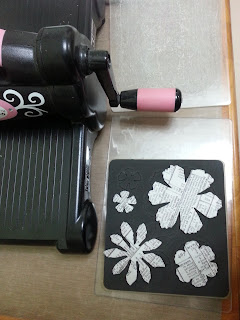


tattered floral challenge

As I haven't got the tissue wrap, therefore, I used the tissue tape and stick on the Grungepaper for the paper. It's seem much easy a it no needs to apply glue.

I was using the tattered floral die before color the grungepaper. It's a little bit different with Tim Holtz's step.

As the ordered set of Distress Paints are not yet arrvied, I used the distress stain instead. However, the color not much as sharp as expected. (As per the blog mentioned, there is no right or wrong product to use, but the final look will definitely vary based on which product you choose.) Therefore, I choose to add the Dabber for more color on that.

Without the pin, I used stickles to add the heart of the flower.

Hope you all enjoy the fun of being creative as Tim Holtz said.


.jpg)
.jpg)
.jpg)
.jpg)
.jpg)